Alright, hamster lovers, let’s talk about the often-dreaded task of cage cleaning! We all want our little furballs to live in a healthy, happy environment, but sometimes it feels like a never-ending cycle of bedding changes and spot checks.
I’ve personally found that striking the right balance between hygiene and causing too much disruption to your hamster’s carefully crafted home can be a real challenge, especially with all the new advice on enrichment and naturalistic setups emphasizing minimal disturbance.
With so much information out there about avoiding harsh chemicals and keeping stress levels low during cleaning, it’s easy to feel overwhelmed. But fear not!
Getting a truly clean cage without stressing out your tiny friend is totally doable. I’m excited to share my tried-and-true methods to make this chore less of a headache and more of a bonding experience, ensuring a spotless and safe haven for your pet.
Let’s make sure your hamster’s pad is always fresh and fantastic, and I’ll show you exactly how in the guide below!
Gathering Your Arsenal: Prepping for a Spotless Sanctuary

When it comes to giving your tiny overlord’s abode a proper scrub, the secret sauce really isn’t in the scrubbing itself, but in the meticulous preparation.
Trust me, I’ve learned this the hard way after a few chaotic cleaning sessions where I realized halfway through I was missing a crucial item, sending me scrambling and causing unnecessary stress for my hamster, Pip.
Before you even think about laying a hand on that cage, gather absolutely everything you’ll need. This means having your temporary holding pen ready, all your cleaning supplies lined up, and fresh bedding and enrichment items waiting in the wings.
Think of it like a chef prepping all their ingredients before starting a complex meal; it makes the whole process smoother, more efficient, and significantly less stressful for everyone involved.
I personally find that having a dedicated “hamster cleaning kit” makes a world of difference. This isn’t just about saving time; it’s about minimizing the disturbance to your hamster’s delicate ecosystem and ensuring a swift return to their freshly cleaned home.
A prepared setup ensures you can move quickly and purposefully, reducing the time your hamster spends displaced and potentially anxious. It’s truly a game-changer for maintaining both hygiene and harmony in your furry friend’s life.
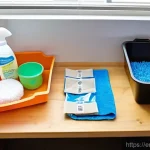
The Essential Hamster Prep Checklist
You might think you’re ready, but a quick run-through of your supplies can prevent a mid-clean crisis. I always make sure I have a secure, adequately sized temporary home for my hamster – a small travel cage or a deep bin with some familiar bedding and a treat works wonders.
This isn’t just a place to stash them; it’s a safe zone where they can feel secure while their main home is being tended to. Beyond that, a sturdy brush, a scraper for stubborn dried-on bits, and plenty of clean cloths are non-negotiable.
I also keep a designated ‘hamster’ sponge that never touches kitchen dishes, preventing any cross-contamination. Having everything within arm’s reach means less back-and-forth, and more importantly, less time your hamster has to spend out of their comfort zone.
Safe Haven Creation: Your Hamster’s Temporary Digs
Creating a comfortable temporary space is paramount. This isn’t just any old box; it needs to be escape-proof, well-ventilated, and have enough space for them to move around a little, plus a small amount of familiar bedding to help them feel secure.
I usually transfer a small handful of their current bedding to the temporary container, along with a favorite toy or a small hide. A little food and water are also crucial if the cleaning takes longer than expected, though for most routine cleans, it’s usually quick enough that they won’t need a full setup.
The goal here is to keep them feeling as safe and undisturbed as possible, which in turn makes the entire cleaning process less fraught with anxiety for both of you.
The Great Eviction: Gently Relocating Your Little Resident
Okay, deep breaths! This is often the trickiest part for many new hamster parents – getting your tiny friend out of their elaborate tunnels and cozy hideouts without causing a panic.
I’ve been there, chasing a surprisingly speedy hamster around a large cage, feeling like a clumsy giant. But over time, I’ve developed a gentle technique that usually works like a charm.
The key is patience and making the process feel as non-threatening as possible. I usually wait until my hamster is naturally awake and active, often in the late evening, as trying to rouse them from a deep sleep can be quite jarring.
I then gently coax them into a small, open container, like a plastic cup or a hamster ball (without the lid, of course, just for scooping). Avoid grabbing them suddenly, as this can trigger a defensive bite or cause undue stress.
Speaking softly and moving slowly are your best friends here. Once they’re safely in their temporary enclosure, make sure it’s in a quiet, safe spot where they can’t be disturbed or accidentally knocked over.
This brief displacement is unavoidable, but minimizing its impact is entirely within your control. I’ve noticed that when I handle this step calmly, my hamsters return to their clean cage much more quickly and with less apprehension.
The Art of the Gentle Scoop
Forget the frantic chase scenes you might imagine. The best way to move your hamster is with a slow, deliberate scoop. I often use a treat to lure them into a small, open container.
For instance, I’ll place a sunflower seed at the bottom of a clean plastic container, gently set it down in their cage, and wait for them to investigate and climb in.
Once they’re inside, I slowly lift the container, keeping it level and steady, and transfer them to their temporary habitat. This method makes them feel like they’re exploring rather than being captured.
If they’re particularly skittish, sometimes a bare hand, slowly introduced and cupped, can work, but always be prepared for a quick dash. It’s all about building that trust and making them feel secure, even during a temporary move.
Securing the Sanctuary: Placement of the Temporary Home
Once your hamster is safely in their temporary digs, where you place it matters. I always put it in a quiet room, away from drafts, direct sunlight, or curious pets.
It needs to be stable and out of the way of foot traffic. The goal is to provide a calm, secure environment where your hamster can chill out while you work on their main home.
I often cover part of their temporary enclosure with a light cloth, creating a darker, more den-like feel, which seems to help them relax. Remember, they’re probably a bit disoriented, so a little extra comfort goes a long way in keeping their stress levels down during this unavoidable upheaval.
Deep Clean Dive: Tackling the Habitat’s Core Elements
Now that your little friend is safely chilling in their temporary pad, it’s time to roll up your sleeves and get down to the nitty-gritty of cleaning their main habitat.
This isn’t just about scooping out old bedding; it’s a comprehensive refresh that addresses every corner, every tunnel, and every accessory. I always start by completely emptying the cage.
This means removing all bedding, toys, food bowls, water bottles, wheels, and any other decorations. It might look like a war zone for a moment, but clearing everything out is essential for a truly thorough clean.
I personally find that using a small, dedicated dustpan and brush helps immensely in getting rid of the bulk of the old bedding, especially from corners and crevices.
For cages with multiple levels or intricate tubes, I make sure to dismantle them completely. This allows me to reach all those hidden spots where waste and odors can accumulate.
Trust me, ignoring those hidden spots is a recipe for a quickly smelly cage and an unhealthy environment for your hamster. This deep dive is crucial for maintaining a truly hygienic and fresh living space that both you and your pet will appreciate.
Disassembling and Decluttering
The first step in any deep clean is to fully disassemble the cage. For modular cages with tubes and connecting parts, take them all apart. This might seem like a chore, but it’s the only way to ensure you can properly clean every nook and cranny.
I’ve seen far too many cases where people just clean the main base, leaving smelly, unsanitary build-up in the tubes. Once everything is separate, dispose of all the old bedding.
If your hamster has a particularly strong hoarding instinct, like my last Syrian, you might find a substantial stash of food. While it’s tempting to save it, it’s generally best to discard old, potentially spoiled food to prevent bacterial growth and pests.
Tackling Accessories and Fixtures
Every single item that was in the cage needs attention. Food bowls and water bottles should be thoroughly scrubbed and disinfected. For water bottles, I use a small brush designed for straws to get into the nozzle, as that’s a common spot for algae and bacterial films to form.
Wheels, tunnels, hideouts, and toys also need a good wash. If they’re plastic, warm soapy water (using a pet-safe soap, of course) works well. For wooden items, you might need to scrape off any dried urine or debris, and then wipe them down.
Keep in mind that porous wood can absorb odors and urine, so some heavily soiled wooden items might need to be replaced periodically. I always check for any signs of wear and tear or damage that might pose a risk to my hamster.
Safe Sanitization: Choosing the Right Cleaning Arsenal
Once everything is stripped down, the real cleaning begins. This is where you bring out your chosen sanitizing agents. However, and this is a big however, you absolutely *must* be mindful of what you’re using.
Hamsters have incredibly sensitive respiratory systems, and harsh chemicals or strong fumes can be incredibly detrimental to their health. I’ve personally seen cases where well-meaning owners used household cleaners that left behind toxic residues, leading to respiratory issues in their pets.
My go-to strategy is always to opt for the safest, most natural options first. White vinegar diluted with water is a fantastic, non-toxic disinfectant and odor neutralizer that I swear by.
For tougher spots, a mild, unscented dish soap, thoroughly rinsed, can also work. The key, no matter what you choose, is thorough rinsing. Any residue left behind can be harmful if ingested or inhaled by your curious little friend.
This step is about more than just making the cage *look* clean; it’s about making it genuinely *safe* and hygienic.
Pet-Friendly Cleaners: Your Best Bet
When it comes to cleaning solutions, less is often more. I always start with hot water and a good scrub. For general sanitization, a solution of 1 part white vinegar to 1 part water is incredibly effective and completely safe once it’s dried.
I spray it generously onto all surfaces, let it sit for a few minutes to work its magic, and then scrub thoroughly. For any particularly stubborn dried urine or food, a paste made from baking soda and water can be a gentle abrasive.
The beauty of these natural options is that they don’t leave behind any harmful chemical residues, provided you rinse well. Avoid anything with strong fragrances, as even “natural” scents can irritate a hamster’s delicate respiratory system.
The Golden Rule: Rinse, Rinse, Rinse!
No matter what cleaner you use, whether it’s vinegar, mild soap, or even a pet-specific cage cleaner, the rinsing phase is paramount. After scrubbing, I rinse every single part of the cage and all accessories multiple times under running water, ensuring every trace of the cleaning agent is gone.
I then let everything air dry completely. Sometimes, for good measure, I’ll even wipe surfaces down with a clean, damp cloth after they’ve air-dried, just to be absolutely certain there’s no residue.
A damp cage can also lead to mold or mildew, which is another health hazard you want to avoid. Patience here truly pays off for your hamster’s well-being.
Reimagining Their Domain: Thoughtful Re-Setup for Happy Hamsters
After all the hard work of cleaning and sanitizing, the most rewarding part (for me, and definitely for my hamster!) is putting everything back together.
This isn’t just about tossing the old stuff back in; it’s an opportunity to refresh their environment, add new enrichment, and perhaps even tweak the layout slightly.
When I’m setting up a freshly cleaned cage, I always think about what my hamster might appreciate most. A deep layer of fresh, soft bedding is always at the top of the list – hamsters love to burrow and tunnel, and providing ample substrate is crucial for their mental and physical well-being.
I also like to strategically place hideouts and tunnels in new configurations to keep things interesting. It’s like giving them a mini home renovation!
I’ve noticed that when I take the time to create an engaging and comfortable environment, my hamsters are much more active, happier, and less stressed, which, in turn, makes me a happy hamster parent.
This is your chance to really show your pet you care, by creating a stimulating and safe space they’ll love to explore.
Bedding Bonanza: Creating the Ultimate Digging Experience
For any hamster, bedding isn’t just flooring; it’s their entire world! I always aim for at least 6-8 inches of soft, absorbent, and dust-free bedding, especially for burrowing species like Syrians.
Paper-based bedding or aspen shavings are my go-to choices. I avoid cedar or pine shavings as they contain oils that can be harmful to a hamster’s respiratory system.
When I’m putting it back in, I don’t just dump it; I fluff it up and create different levels and little hills, encouraging their natural instinct to dig and tunnel.
Sometimes, I’ll even hide a few treats within the bedding, making their return a fun scavenger hunt. It really is incredible to watch them immediately start exploring and rearranging their newly fluffed domain.
Strategic Enrichment: More Than Just Toys

Reintroducing toys and accessories isn’t just about putting them back; it’s about thinking strategically. I try to offer a variety of textures and activities.
This might mean rotating out some old toys for new ones, or simply placing familiar items in a slightly different spot to encourage exploration. I always ensure their wheel is clean and securely fastened – a wobbly wheel is no fun!
For hamsters, enrichment isn’t a luxury; it’s a necessity for preventing boredom and promoting natural behaviors. Providing chew toys, different tunnels, and even a sand bath (for appropriate species) can make a huge difference in their overall happiness.
| Cleaning Task | Recommended Frequency | Key Considerations |
|---|---|---|
| Spot Cleaning (removing soiled bedding/food) | Daily | Essential for odor control and hygiene; quick and minimally disruptive. Focus on bedding around the potty area and discarded fresh food. |
| Water Bottle & Food Bowl Cleaning | Daily (Water Bottle); Every 2-3 days (Food Bowl) | Prevents bacterial growth and algae. Use a small brush for water bottle nozzles. Wash bowls with pet-safe soap and rinse thoroughly. |
| Full Cage Deep Clean | Every 2-4 weeks (depending on cage size & hamster) | Complete bedding change, scrubbing all surfaces and accessories. May need to be more frequent for smaller cages or multiple hamsters. Ensure complete drying before reassembly. |
| Wheel & Heavy Use Toys | Weekly (spot clean); Bi-weekly (full wash) | Wheels can get soiled quickly, impacting smooth operation and hygiene. Wooden items may need more frequent spot cleaning or replacement if heavily saturated. |
| Tube & Tunnel Cleaning | Bi-weekly to Monthly | These can accumulate waste and food debris. Disassemble and use a brush specifically for tubes to ensure thorough cleaning. |
Maintaining the Sparkle: Daily Quick Tidy Ups
Let’s be real, a full deep clean every week or two is a commitment, but you know what keeps those big cleans from becoming epic battles against grime and odor?
Daily spot cleaning! This isn’t just a suggestion; it’s absolutely crucial for maintaining a fresh environment and extending the time between those more intensive cleaning sessions.
I’ve found that spending just a few minutes each day, usually in the evening when my hamsters are most active, can make a monumental difference. It’s about nipping potential problems in the bud before they become, well, stinky problems.
Focusing on the areas where your hamster typically does their business, or where they stash fresh food, can prevent a lot of headaches down the line. It’s a small investment of time that pays off huge dividends in terms of a healthier, happier hamster and a much more pleasant living situation for you.
Trust me, your nose, and your hamster, will thank you for it!
Targeting the “Potty” Zones
Most hamsters are creatures of habit and will often choose a specific corner or area as their “bathroom.” Identifying these high-traffic zones is key to effective spot cleaning.
I usually use a small scoop or a paper towel to remove any soiled bedding, dropping, or wet spots. For hamsters that consistently use a particular area, a designated “potty” or sand bath can be a game-changer, making daily clean-up incredibly easy.
Just remember to clean the potty itself daily! If you’re using a sand bath for this purpose, sifting the sand daily is a must to remove any clumps. This targeted approach prevents odors from building up and keeps the bulk of the bedding clean for longer.
Clearing the Pantry: Fresh Food Management
Hamsters are notorious for stashing food, and while this is a natural behavior, fresh food (like fruits, vegetables, or proteins) can spoil quickly if left hidden.
During my daily tidy-up, I always do a quick check of known hiding spots, gently lifting bedding to ensure no old, rotten food is lurking. Any uneaten fresh food should be removed promptly to prevent mold growth and attract pests.
This isn’t about being intrusive; it’s about being a responsible caretaker. I’ve learned that a quick, gentle sweep for forgotten broccoli florets or apple slices is far better than discovering a moldy surprise later!
Beyond the Basics: Troubleshooting & Stress-Free Solutions
Even with the best intentions and a solid routine, sometimes things don’t go exactly as planned. Maybe your hamster is unusually stressed during cleaning, or perhaps you’re struggling with persistent odors despite your best efforts.
I’ve been there, scratching my head, wondering what I could be doing differently. Troubleshooting these little hiccups is part and parcel of being a hamster parent, and often, the solutions are simpler than you think.
It’s about listening to your hamster (figuratively speaking, of course!), observing their behavior, and being willing to adapt your cleaning approach.
Sometimes, a tiny tweak can make a huge difference in reducing stress for your pet and making the chore more manageable for you. Don’t get discouraged if your first few attempts aren’t perfectly smooth; it’s a learning curve for both of you!
Calming Techniques for Anxious Hamsters
If your hamster gets particularly stressed during cleaning, there are strategies you can employ to make it easier. I’ve found that talking to them softly throughout the process, even just humming, can be incredibly soothing.
Keeping their temporary enclosure in a quiet, dimly lit area can also help them feel more secure. Some hamsters respond well to having a familiar scent in their temporary home – a small piece of fabric that smells like their bedding (or even you!) can provide comfort.
If you notice signs of extreme stress, like frantic pacing, excessive biting, or freezing, try to speed up the cleaning process and return them to their home as quickly as possible.
Sometimes, even just shortening the duration of their displacement by streamlining your cleaning steps can be the key.
Tackling Stubborn Odors and Persistent Problems
Lingering odors, even after a deep clean, can be frustrating. If you’re consistently battling smells, first double-check your cleaning agents and rinsing process.
Are you using strong fragrances? Are you rinsing thoroughly? Sometimes, the issue isn’t the cleaning but the type of bedding or cage material.
Plastic cages can absorb odors over time, while glass tanks tend to be less problematic. If odors persist, consider changing your bedding brand to one known for better odor control, or increase the frequency of your spot cleaning.
Ensuring adequate ventilation in the room where the cage is kept can also help dissipate any ambient smells. If all else fails, a small, pet-safe air purifier near the cage (but not directly blowing on it) can make a difference.
Embracing the Routine: Consistency is the Secret Sauce
Let’s face it, cleaning isn’t usually anyone’s favorite pastime, and that definitely extends to cleaning hamster cages. But here’s the thing I’ve truly come to understand: consistency isn’t just about keeping things tidy; it’s about establishing a rhythm that benefits both you and your hamster.
When you have a predictable cleaning schedule, whether it’s daily spot checks or a bi-weekly deep dive, it becomes less of a dreaded chore and more of an ingrained habit.
And for your hamster, that predictability can be incredibly reassuring. They learn what to expect, and while they might not *love* being temporarily relocated, the routine helps them cope with the disruption more easily.
I’ve personally noticed a huge difference in my hamsters’ demeanor when I stick to a consistent schedule – they seem less stressed, settle back into their clean home faster, and are generally more content.
It transforms cage cleaning from a frantic scramble into a smooth, almost meditative process. Making it a consistent part of your pet care routine truly unlocks the secret to a perpetually fresh and happy hamster home.
Scheduling for Success: Finding Your Rhythm
The best cleaning schedule is the one you can stick to. While general guidelines exist, personalizing it to your lifestyle and your hamster’s needs is crucial.
For instance, if you have a busy week, you might lean more heavily on daily spot cleans and push the full clean by a few days, but then ensure it happens.
I find setting a recurring reminder on my phone helps immensely. Perhaps Sundays are for deep cleaning, and every evening before bed is for a quick spot check.
Think about when you have the most energy and time, and build your routine around that. Don’t be afraid to adjust it as you go along; the goal is consistency, not rigid adherence to an unworkable plan.
The Payoff: A Happier Hamster, A Healthier Home
Ultimately, all this effort boils down to one thing: providing the best possible environment for your tiny companion. A clean cage means a reduction in harmful bacteria, mold, and parasites, leading to a healthier hamster.
But it’s more than just health; it’s about their overall well-being and happiness. A fresh, stimulating, and odor-free environment allows them to exhibit their natural behaviors, explore, burrow, and simply enjoy being a hamster.
And honestly, there’s nothing more satisfying than seeing your little furball happily popcorning around their freshly cleaned and rearranged home. It’s a clear sign that your hard work has paid off, and that, for me, is the ultimate reward of hamster parenthood.
Wrapping Up Our Cleaning Journey
Whew! We’ve covered a lot, haven’t we? Taking care of our tiny friends’ homes is truly a labor of love, and while it might seem like a daunting task at first, I hope this guide has shown you that with a little preparation and a consistent routine, it can become a rewarding part of your pet parenting journey. Remember, a clean cage isn’t just about appearances; it’s fundamental to your hamster’s health, happiness, and overall well-being. Seeing my little Pip popcorn with joy in his freshly cleaned and thoughtfully arranged habitat is genuinely one of the most satisfying moments, making every scrub and rinse absolutely worth it. It truly strengthens that special bond we share with our furry companions.
Handy Tips for a Happy Hamster Home
1. Scent Marking Strategy: If your hamster gets very stressed during a full clean, try leaving a small, clean-but-scented piece of their old bedding (from a non-potty area) in a new spot in the fresh bedding. This familiar scent can help them feel more secure and settle in faster, reminding them that this is still *their* space.
2. Modular Cleaning Approach: For larger or multi-level cages, consider cleaning sections or levels on different days, if feasible. This can reduce the overall disruption for your hamster, as they still have a “safe” zone to retreat to while another part of their home is being cleaned. Just make sure to keep on top of those daily spot cleans!
3. The Power of Rotation: Don’t put all the same toys back in the exact same spots every time. I love rotating enrichment items – bringing out old favorites, introducing new ones, or just placing them differently. It keeps their environment stimulating and prevents boredom, encouraging more activity and exploration. Think of it as redecorating for them!
4. Emergency Kit Prep: Accidents happen! Always have a small emergency kit handy with things like saline solution (for eye irritations), pet-safe antiseptic wipes, and a few extra bedding supplies. Being prepared for minor scrapes or unexpected messes can save you a frantic trip to the pet store.
5. Observe and Adapt: Every hamster is a unique little personality. Pay close attention to how your hamster reacts to cleaning day. Do they prefer quiet? Are they more stressed by certain cleaning products? Use these observations to fine-tune your routine, making it as stress-free and efficient as possible for both of you. This personalized approach makes all the difference.
My Top Takeaways for a Pristine Pet Pad
Alright, if there are three things I want you to walk away with after our chat on hamster cage cleaning, it’s these. First, preparation is your superpower. Trust me, trying to find that missing scraper or a clean cloth mid-clean when your hamster is already impatiently waiting in their temporary digs is a recipe for chaos. Gather *everything* beforehand, and the whole process will flow like a dream. Second, safety trumps everything. What you use to clean your hamster’s home directly impacts their delicate health. Stick to pet-safe, non-toxic cleaners like diluted white vinegar, and rinse, rinse, rinse! Any chemical residue is a big no-no. Your hamster’s sensitive respiratory system will thank you.
And finally, and perhaps most importantly, consistency is truly the secret sauce to a happy and healthy hamster. Those daily spot checks aren’t just an option; they’re vital. A regular cleaning rhythm not only keeps odors at bay and prevents unhealthy bacteria from thriving, but it also creates a predictable, less stressful environment for your furry friend. When you make cleaning a consistent part of your routine, it becomes less of a chore and more of an ingrained act of love and care. It’s an investment in their well-being that pays off tenfold in cuddles, zoomies, and that pure joy of seeing them thriving in a clean, enriching home. Remember, a clean home equals a happy hamster, and that’s what we’re all aiming for, right?
Frequently Asked Questions (FAQ) 📖
Q: How often should I really deep clean my hamster’s cage, and what about those quick spot checks?
A: Oh, this is a question I get all the time! And honestly, there’s no one-size-fits-all answer because it really depends on your specific setup and your little furball’s habits.
From my own experience, I’ve found that a full, deep clean of the entire cage is usually needed every 2-4 weeks. If you have a larger cage, say, a 40-gallon breeder tank or bigger, you might be able to stretch that to once a month.
But if you’re rocking a smaller starter cage, or if you have a hamster who just loves to make a mess in every corner, you’ll probably be leaning closer to every two weeks.
The real secret weapon here, though, is daily or every-other-day spot cleaning. Seriously, I just take a moment each day to scoop out any obvious soiled bedding, especially in their designated potty corner – most hamsters are pretty tidy and pick a spot!
I also check for any uneaten fresh food that might go bad. This routine makes the deep cleans so much less daunting and keeps the ammonia buildup at bay, which is super important for their tiny respiratory systems.
It also means you’re disrupting their environment less often, which they absolutely appreciate. It’s all about observing your unique little friend and finding a rhythm that works for both of you!
Q: What’s the best way to clean my hamster’s cage without turning it into a stressful ordeal for my tiny friend?
A: This is where a little empathy goes a long long way! I totally get it – you want a sparkling clean cage, but you definitely don’t want to freak out your hamster.
I’ve learned a few tricks over the years that really help. First things first, have a secure, temporary holding area ready for your hamster. I usually use a clean, carrier with some of their old, unsoiled bedding and a favorite toy or treat to make them feel safe and comfortable.
Never, ever just leave them wandering around while you clean; it’s just too risky. When you’re scooping out the old bedding, try to save a good handful of the cleanest stuff to mix back into the fresh bedding.
This familiar scent helps them feel at home faster and reduces stress – it’s like their personal “this is my space” marker. I also make a point of not completely dismantling their entire burrow or food stash if I can help it.
If they’ve carefully built a little tunnel system, I try to clean around it or gently scoop it out and replace it as intact as possible. Remember, their hoard is super important to them, so if you can avoid touching it too much, they’ll be much happier.
A calm, gentle approach and a soothing voice from you can also make a huge difference.
Q: When it comes to cleaning products, what’s truly safe for my hamster’s cage, and what should I absolutely avoid?
A: Oh, this is a big one, and it’s something I feel really strongly about! When we’re talking about cleaning products for our little hamsters, less is definitely more.
My absolute go-to, tried-and-true, super safe cleaner is a simple solution of plain old white vinegar and water. I usually do about a 1:1 ratio. It’s fantastic for disinfecting, cutting through odors, and it’s completely non-toxic once it dries and the scent dissipates.
After scrubbing with the vinegar solution, I always, and I mean always, rinse the cage thoroughly with warm water, multiple times if needed, to make sure there’s no residue or strong vinegar smell left.
Then, I let it air dry completely before putting any bedding back in. Another perfectly safe option is just warm water and a good scrubbing brush, especially for light cleaning.
Now, for the things to avoid like the plague: any harsh chemical cleaners, bleach, scented detergents, or anything with a strong fragrance. These can be incredibly irritating and even toxic to your hamster’s delicate respiratory system.
Even “pet-safe” cleaners should be used with caution; always read the label thoroughly and ensure they are specifically safe for small animal habitats.
Trust me, a little elbow grease with vinegar and water works wonders and gives me such peace of mind knowing my little furball isn’t breathing in anything nasty.